
Inverse Kinematics: how to move a robotic arm (and why this is harder than it seems)
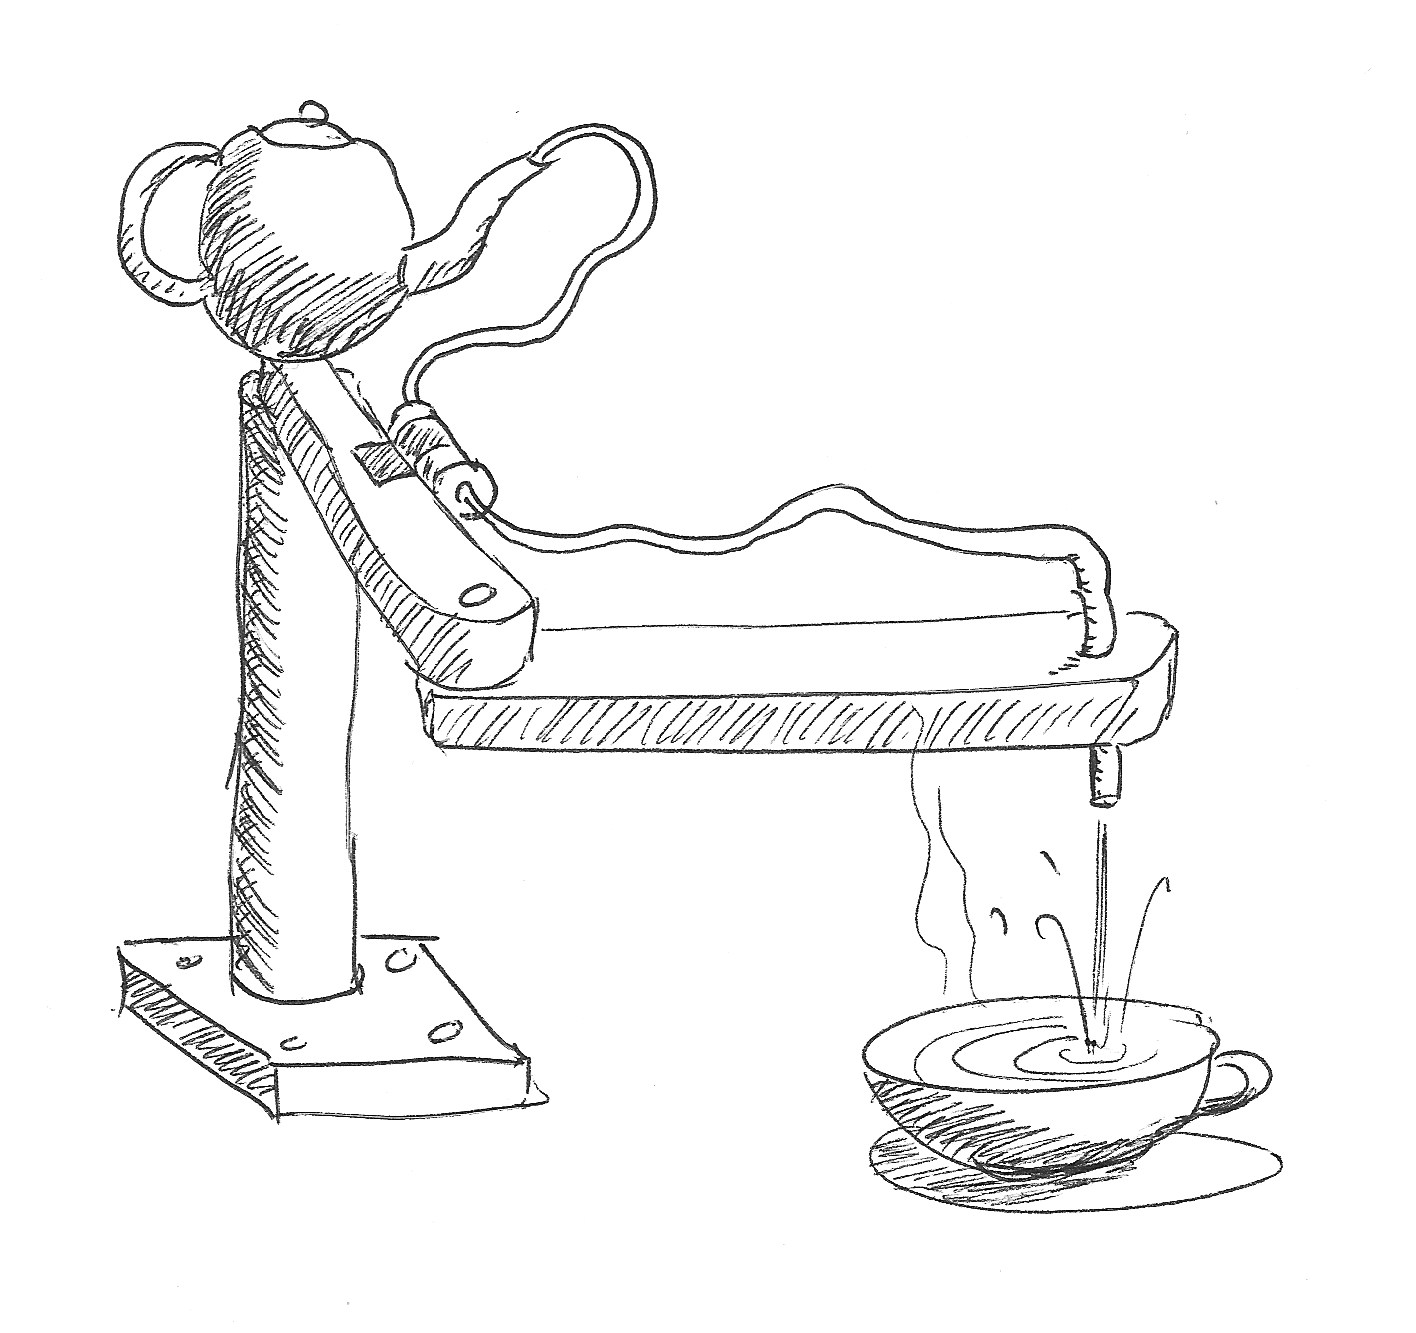
So you have built a robotic arm? Great, let's write some Go to make it serve your five o'clock tea. Sounds simple enough. Or is it?
Table of contents
Forward kinematics
Calculating the current coordinates of a robot's hand is easy.
We just need to look at each segment of a robot's arm–the coordinates of the segment's base, the direction of the joint's axis, the angle between this segment and the next one, and the length of the segment–in order to calculate where the end of this segment is. Repeat this with each segment, until we arrive at the robot's hand. Et voilà: we determined the hand's position.
This is called forward kinematics.
Inverse kinematics
Now the robot's arm must adjust each joint's angle in order to move its hand over the cup. This is quite the opposite of the previous calculation - here, we start with a given position and want to know how to rotate each segment of the arm.
It turns out that this is much harder than the forward case. And whenever something is hard to solve, there are usually several different approaches available for solving that problem. For inverse kinematics, there are three of them:
- The algebraic approach: This basically works by solving (frankly, rather complex) matrix equations.
- The geometric approach: The idea is to combine knowledge about the robotic arm's geometry with suitable trigonometric formulas.
- The numeric approach: Take a guess and look how far we are off. Move one or more segments to locally minimize the error. Repeat.
Which one to pick? After all, each of them has its raison d'être.
For the sake of brevity, let's drop the first one. It involves a lot of matrix calculations, and frankly, I haven't done any since the last millennium or so.
The second one, the geometric approach, can become quite complex when the robot's arm consists of many segments and joints. Luckily, all complexity vanishes in the case of a simple robotic arm with only two segments, so let's go with this approach. (In a future article, I'll give the numeric approach a try.)
At this point, I must admit that when I started working on this article, I expected that the formulas for the simple two-segment arm could easily be generalized to multi-segment, multi-joint robotic arms, but I found that this is not the case. So for this article, we'll stick with what is probably the most simple robotic arm with rotary joints.
The SCARA robot
Our robotic arm shall meet the following requirements.
- The arm has only two segments of fixed length.
- The segments can only rotate around their base joint; there is no sliding movement.
- The axes of both joints have the same direction.
- There is no hand attached to the end of the arm. (Robot hands would have additional degrees of freedom, and remember that we want to keep things simple. Now you know why our robot just serves tea.)
A robot of this kind is called a SCARA robot.
Here is a schematic diagram of our robot:
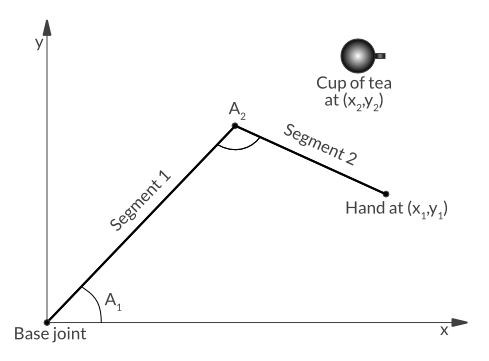
Applying the geometric approach to the SCARA robot
Let me just tweak the diagram a little by replacing some of the labels and adding one line and two angles:
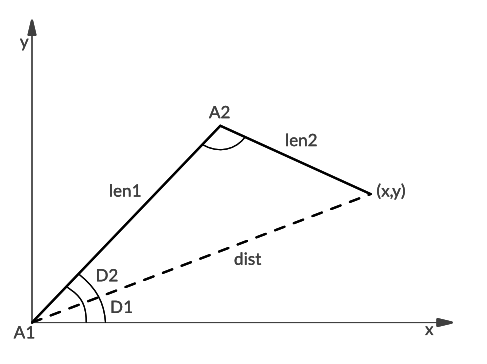
This diagram tells us a couple of things:
- The segments have the length len1 and len2, respectively.
- The root joint describes an angle A1 measured from the x axis.
- The second joint describes an angle A2 measured from the first segment (counterclockwise in both cases).
- The tip of segment 2 points to (x,y), and we want to calculate back from that point to the yet unknown values of A1 and A2.
In the diagram you also see a new dotted line named dist. It points from (0,0) to (x,y), and as you can easily see, the three lines dist, len1, and len2 define a triangle. Furthermore, dist divides angle A1 into two angles D1 and D2.
Now is a good moment to dig out an old trig formula you may remember from school: The law of cosines.
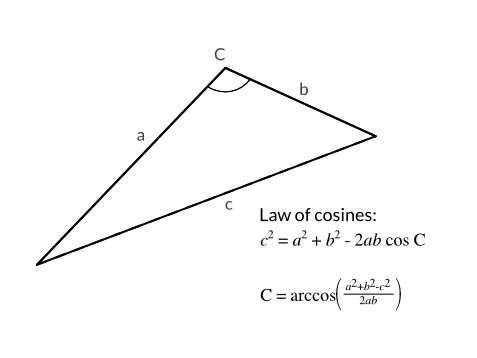
The law of cosines (see the first formula in the figure above) is a generalization of the Pythagorean theorem (c2 = a2 + b2 for right(-angled) triangles) to arbitrary triangles. We do not need the basic form, but rather the transformed version that you can see below the original formula. With this version, we can calculate angle C from the triangle's sides a, b, and c. This comes handy in two places, as we'll see shortly.
So how do we calculate A1 and A2?
From the robotic arm diagram above (the one with D1, D2, dist, etc), we can directly derive the first formula:
A1 = D1 + D2D1 is fairly easy to calculate. In the following diagram, x, y, and dist define a right-angled triangle. Here, D1 can be calculated in two ways: The arcsine of y/dist or the arctangent of y/x. As we have x and y readily available, let's choose the arctangent formula.
However, there is a problem hidden here. The formulas certainly are correct if x and y are positive, but what if either of the two, or even both, are negative? Luckily, a solution is available in form of a method from the standard library:
math.Atan2(y, x). It delivers the correct result for all possible combinations of x and y. (More details on Wikipedia.)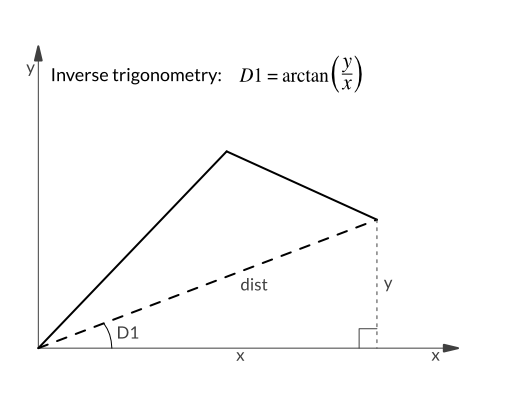
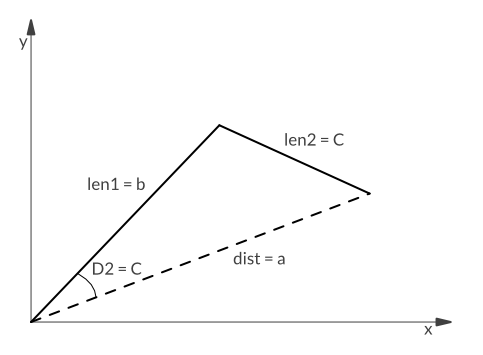
D2 requires the law of cosines. Basically, we just map our “robot triangle” to the “law of cosines” triangle by using dist as a, len1 as b, and len2 as c. The resulting angle C is our D2.
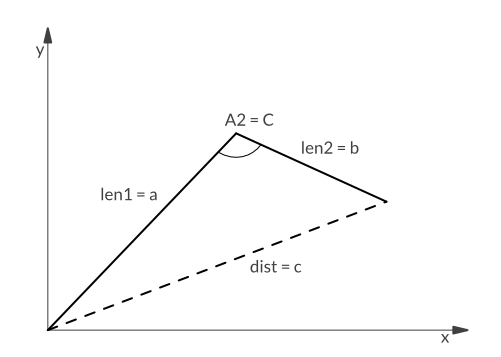
- Now only A2 is left. Luckily, we can reuse the law of cosines for this. We only need to map our triangle to the one from the law of cosines with different parameter mappings than for D2: len1 as a, len2 as b, and dist as c.
And that's it. Let's pour this into code now.
The code
package main
math package is needed for the formulas.import (
"fmt"
"math"
)
const (
	len1 = 10.0
	len2 = 10.0
)
func lawOfCosines(a, b, c float64) (C float64) {
	return math.Acos((a*a + b*b - c*c) / (2 * a * b))
}
func distance(x, y float64) float64 {
	return math.Sqrt(x*x + y*y)
}
func angles(x, y float64) (A1, A2 float64) {
dist := distance(x, y)
Atan2 is a modified arctan() function that returns unambiguous results. D1 := math.Atan2(y, x)
D2 := lawOfCosines(dist, len1, len2)
A1 = D1 + D2
	A2 = lawOfCosines(len1, len2, dist)

	return A1, A2
}
func deg(rad float64) float64 {
	return rad * 180 / math.Pi
}

func main() {

	fmt.Println("Lets do some tests. First move to (5,5):")
	x, y := 5.0, 5.0
	a1, a2 := angles(x, y)
	fmt.Printf("x=%v, y=%v: A1=%v (%v°), A2=%v (%v°)\n", x, y, a1, deg(a1), a2, deg(a2))

	fmt.Println("If y is 0 and x = Sqrt(10^2 + 10^2), then alpha should become 45 degrees and beta should become 90 degrees.")
	x, y = math.Sqrt(200), 0
	a1, a2 = angles(x, y)
	fmt.Printf("x=%v, y=%v: A1=%v (%v°), A2=%v (%v°)\n", x, y, a1, deg(a1), a2, deg(a2))

	fmt.Println("Now let's try moving to (1, 19).")
	x, y = 1, 19
	a1, a2 = angles(x, y)
	fmt.Printf("x=%v, y=%v: A1=%v (%v°), A2=%v (%v°)\n", x, y, a1, deg(a1), a2, deg(a2))

	fmt.Println("n extreme case: (20,0). The arm needs to stretch along the y axis.")
	x, y = 20, 0
	a1, a2 = angles(x, y)
	fmt.Printf("x=%v, y=%v: A1=%v (%v°), A2=%v (%v°)\n", x, y, a1, deg(a1), a2, deg(a2))

	fmt.Println("And (0,20).")
	x, y = 0, 20
	a1, a2 = angles(x, y)
	fmt.Printf("x=%v, y=%v: A1=%v (%v°), A2=%v (%v°)\n", x, y, a1, deg(a1), a2, deg(a2))

	fmt.Println("Moving to (0,0) technically works if the arm segments have the same length, and if the arm does not block itself. Still the result looks a bit weird!?")
	x, y = 0, 0
	a1, a2 = angles(x, y)
	fmt.Printf("x=%v, y=%v: A1=%v (%v°), A2=%v (%v°)\n", x, y, a1, deg(a1), a2, deg(a2))

	fmt.Println("What happens if the target point is outside the reach? Like (20,20).")
	x, y = 20, 20
	a1, a2 = angles(x, y)
	fmt.Printf("x=%v, y=%v: A1=%v (%v°), A2=%v (%v°)\n", x, y, a1, deg(a1), a2, deg(a2))
}
“Homework assignment”
Why does A1 evaluate to NaN (“Not a Number”) when we try moving the arm to (0,0)?
Hint 1: It is about the law of cosines function.
Hint 2: The arm does not form a triangle in this case. (Yes, this hint is actually a spoiler, sorry…)
Outlook
In a future article we'll look into the numeric approach. That is, we let the robot iteratively move its arm in small steps until it reaches the target.
Next week's article is a lightweight take on Dependency Injection.
Until then, have fun!
Updates
2017-01-13: Fixed: The code uses Atan2 to calculate D1, but the text used Pythagoras.