
CLI tools FTW (or: how to distribute your CLI tools with goreleaser)
“go get” is a super-simple way of installing Go binaries, but not everyone has a Go compiler installed. If you want to make your CLI tools and apps available to the world, have a look at goreleaser.
Table of contents
When I browse through Go repos on GitHub, more often than not I see this installation instruction:
go get github.com/owner/repo
Granted, go get is intriguingly simple to use, and if your CLI tool is targeted towards Go developers, it is absolutely ok to use built-in tools for sharing your work.
If your CLI tool is not restricted (or even related) to Go development, you will want to enable your target audience to get your tools the way they are familiar with.
Meet goreleaser
![]()
Luckily, you do not need to become a package manager expert. There is a tool for this: goreleaser. Mostly known for use inside CI/CD pipelines, it also does a great service if you want to publish binaries for manual installation.
When goreleaser is integrated into a CI/CD context, it is super simple to use. Just trigger the CI/CD workflow and it does the rest.
If you develop your Go CLI tool without a CI/CD pipeline, goreleaser as a command-line tool is almost as easy to use. In the following sections, I present a short walkthrough of setting up and using goreleaser for publishing binaries for various platforms on GitHub.
As a sample project, I use goman, the “missing man pages” tool for Go that turns the repo README into an ad-hoc help page. (See this post for an intro to goman.)
Using goreleaser on the command line
Setting up goreleaser consists of a couple of simple steps.
- Install
goreleaser - Run
goreleaser init - Edit the configuration file and:
- Add or modify prebuild hooks
- Add a GitHub/GitLab/Gitea token
There are a couple of optional steps available, depending on which features you want to use. Here, I'll focus on two of these.
- How to generate binaries for various platforms
- How to sign your release
Finally, I will show a fancy bonus feature: How to have your binary print the current version, without having to manually maintain a version string in your code.
Installing goreleaser
Not surprisingly, goreleaser is published using goreleaser, so for installing you can pick your favorite installation method. Head over to the Install - GoReleaser document and follow the steps for the desired installation method.
Initial setup
After having installed goreleaser, cd into your Go CLI project and run
goreleaser init
to generate a default config file named .goreleaser.yml. The configuration uses YAML syntax. If you are not familiar with YAML, you will want to keep the YAML reference at hand. Don't let the large TOC of this spec scare you off. The spec comes with clear examples for each and every data type representation.
The default file looks like this:
before:
  hooks:
    - go mod download
    - go generate ./...
builds:
  - env:
      - CGO_ENABLED=0
    goos:
      - linux
      - windows
      - darwin
archives:
  - replacements:
      darwin: Darwin
      linux: Linux
      windows: Windows
      386: i386
      amd64: x86_64
checksum:
  name_template: 'checksums.txt'
snapshot:
  name_template: "{{ .Tag }}-next"
changelog:
  sort: asc
  filters:
    exclude:
      - '^docs:'
      - '^test:'
The file already contains a couple of build actions and release targets.
- The “before” hooks declare commans to run prior to building the binary
- The “builds” settings describe environment variables to use and target operating systems to compile for. (The provided defaults disable CGO and compile to linux, windows and darwin)
- The “archives” target produces tarred and gzipped binaries. The “replacement” settings beneath controls how the resulting archive files are named.
- The “checksum” target generates (surprise, surprise) a checksum file
- The “snapshot” setting allows creating a test release “between” two versions
- The “changelog” target generates a change log for the release page on the Git host.
A few basic customizations
The first change I am going to apply is a modification of the before hooks. goman needs no go generate (so I remove it), and I also want to tidy my go.mod file at this occasion.
before:
  hooks:
    - go mod tidy
    - go mod download
Hooks are executed in the order of appearance, so no surprises here.
This setup already allows a first test. goreleaser can run in a test mode, without publishing anything.
Call
goreleaser release --snapshot --skip-publish
The command creates a dist directory, compiles binaries for all targets provided, and tars an gzips them into archives, based on the archives section in the above config.
If you run this step yourself, you may notice a message saying, “gomod.proxy is disabled”. This is indeed always true for snapshot builds, but is also the default for release builds. So my next change to the config file is to enable the Go proxy, in order to ensure verifiable builds. There is a special gomod option available for this:
gomod:
  proxy: true
(You will want to set it to false (which is the default value) if your repo is private or resides on a private Git server.)
Also, for Windows, the archive format should be “zip”. A simple format override inside the “archives” section does the trick.
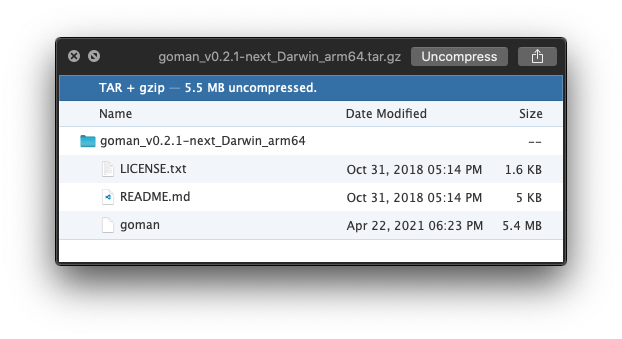
And while we are at it, let's also add the README and LICENSE files, and wrap it all into a single directory inside the archive.
archives:
  -
    replacements:
      ...
    format_overrides:
    - goos: windows
      format: zip
    files:
      - README.md
      - LICENSE*
    wrap_in_directory: true
As a result, the generated archive contains the binary and the additional files inside a subdirectory with the archiv file's base name:
Release!
Let's do a first release now.
For the release to work properly, the repository must contain a tag that adheres to Semantic Versioning (or SemVer). TL;DR: the tag format is “va.b.c” where a, b, and c stand for the major, minor, and patch number. Example: v1.12.0.
The Git tag must be an annotated tag (that is created with either an -a, -s, or -u flag).
For example, if my repo has no tags yet, I can start with v0.1.0:
git tag -a v0.1.0 -m "First release"
git push --tags
If the remote repository is hosted on GitHub or GitLab, goreleaser needs an access token to act on behalf of the repo owner. Ensure to grant only the scopes necessary for building a release. This usually includes access to repositories but no other objects. I skip the exact steps as they are specific to the Git hoster. See here for GitHub or here for GitLab.
The generated token needs to be set in the shell environment, to be accessible to goreleaser. Usually, the token pages shows the token only once for security reasons, so be sure to copy it and save it to your shell initialization file.
Example (yes that's no real token, I just made it up):
export GITHUB_TOKEN=TheLongCharacterSaladThatYouCopiedFromTheTokenPage
No I am ready to create a release, by calling
goreleaser release --rm-dist
Using --rm-dist causes goreleaser to remove the dist/ directory prior to building, if it exists. Otherwise, goreleaser complains about the existing dist/ dir, to avoid overwriting content unintentionally.
A quick tip here: add dist/* to the .gitignore file. You neither need nor want to put the dist/ folder under source control, and goreleaser complains about a dirty repo state if there are untracked files inside the working folder.
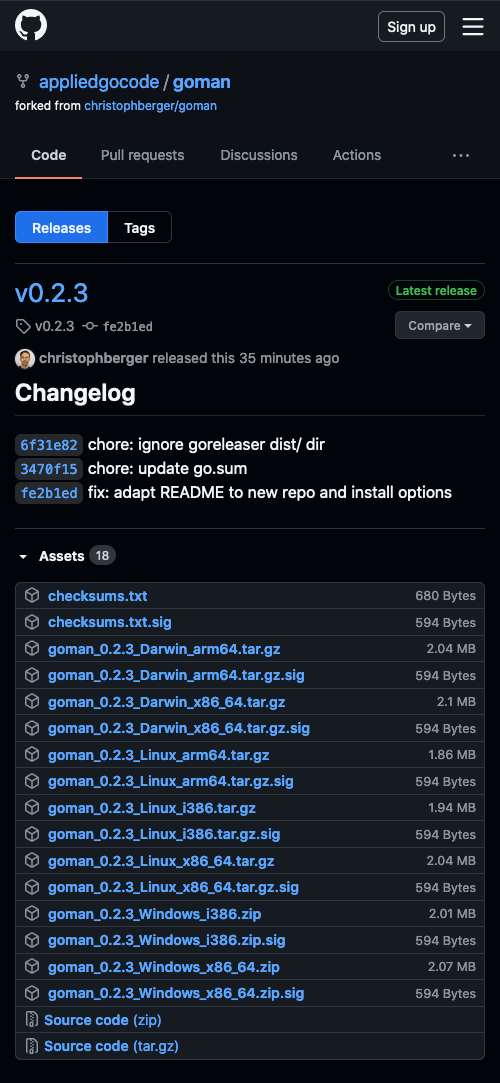
If everything goes well, the release command should do some generating, building, and packaging, and finally return a success message. At this point, the repository page on GitHub (or GitLab or Gitea or your Git server) shows a new release, including changelog and asset files:
Your signature here: _____________
Next, I want to sign my releases using my GitHub GPG key. By adding a GPG signature, I can prove that it was me who compiled the code. So if you trust me, you can also trust the binaries.
Pro Tip: How can you put reasonable trust in a PGP or GPG based signature from some random guy on the internet?
Keybase.io aims to solve this problem by enabling that random guy to provide some kind of social proof.
If you head over to my Keybase page, you can see that I am verified as the owner of various accounts and Web sites (like Twitter, Reddit, HN, this blog, etc). If you know me from any of these services or pages, you have an idea of who I am, and you can decide if you want to trust me to be a good guy who does not put evil things inside the binaries.
I have gpg installed and my Keychain is set up, so I can go ahead and add the following to .goreleaser.yml:
signs:
  artifacts: all
This is all! This works because goreleaser has reasonable defaults in place (such as the path to the gpg binary), which can be overridden of course if the need arises.
But wait, my GPG key's main user ID is not my GitHub ID. To fix that, I can tell goreleaser to pass “-u <user ID>” to gpg. However, this replaces the default argument list, so I need to specify all of them, not just -u:
signs:
  - artifacts: all
    args:
      [
        "-u",
        "[email protected]",
        "--output",
        "${signature}",
        "--detach-sign",
        "${artifact}",
      ]
Now when I run goreleaser release --rm-dist (and enter my gpg password when prompted), all artifacts receive a .sig file that PGP or GPG can use for verifying the author of the binary. If someone tampers with the binaries on GitHub (in whatever way they could achieve that), they will not be able to re-sign the binary in my name.
A user only needs to download the binary of their choice, along with the accompagnying .sig´ file, and call gpg
Ready to go!
This is a minimal setup for getting a binary out to an audience who do not have Go installed for compiling the binary from the source.
This is the complete .goreleaser.yml file that I built during the steps above.
before:
  hooks:
    - go mod tidy
    - go mod download
builds:
  - env:
      - CGO_ENABLED=0
    goos:
      - linux
      - windows
      - darwin
archives:
  - replacements:
      darwin: Darwin
      linux: Linux
      windows: Windows
      386: i386
      amd64: x86_64
    format_overrides:
      - goos: windows
        format: zip
    files:
      - README.md
      - LICENSE*
    wrap_in_directory: true
checksum:
  name_template: "checksums.txt"
snapshot:
  name_template: "{{ .Tag }}-next"
changelog:
  sort: asc
  filters:
    exclude:
      - "^docs:"
      - "^test:"
gomod:
  proxy: false
signs:
  - artifacts: all
    args:
      [
        "-u",
        "[email protected]",
        "--output",
        "${signature}",
        "--detach-sign",
        "${artifact}",
      ]
A macOS caveat
Unfortunately, there is a “small” caveat for macOS users. The OS refuses to run any downloaded binary that is not signed by an Apple developer account. A seasoned developer knows that they can use curl --output <file> -L <url-to-tar-gz-file> in order to circumvent that check; however, the standard Mac user wants a more convenient way.
So in the next post I will look into releasing macOS binaries to a Homebrew tap.
Links
Goreleaser home: https://goreleaser.com
See also
goman, the missing Go man pages viewer.
Happy coding!