
How to Create PDF Documents
Pure data is for computers and nerds like you and me. Anyone else likes nicely formatted reports. Go and a good PDF package can help.
Table of contents
The above video is available on the Applied Go channel on YouTube.
This article examines the code used in the video.
Numbers have an important story to tell. They rely on you to give them a clear and convincing voice.
(Stephen Few)
In the last article we exported orders from a spreadsheet and turned them into a report that we saved as CSV data.
Now our boss requests this data as a shiny PDF report on her desk. Let's do that, no problem! But wait, the standard library has no PDF package, right? Luckily, after a short search, we find a package called gofpdf on GitHub.
After go getting the package, we can start coding right away.
package main

import (
	"encoding/csv"
	"log"
	"os"
	"time"

	"github.com/jung-kurt/gofpdf"
)
The top-level flow
main().This flow is quite simple as it consists of only a few linear steps.
func main() {
data := loadCSV(path())
pdf := newReport()
	pdf = header(pdf, data[0])
	pdf = table(pdf, data[1:])
	pdf = image(pdf)

	if pdf.Err() {
		log.Fatalf("Failed creating PDF report: %s\n", pdf.Error())
	}
	err := savePDF(pdf)
	if err != nil {
		log.Fatalf("Cannot save PDF: %s|n", err)
	}
}
Side Note: gofpdf Error Handling
A somewhat unusual feature of gofpdf is that it does not return errors in the usual way. Instead, if one of the methods of the Fpdf object triggers any error, the Fpdf object stores this error and lets all subsequent method calls “fall through”.
The error can then be verified by calling Fpdf’s Err() method, and printed by calling its Error() method.
if pdf.Err() {
    log.Fatalf("Cannot create PDF: %s\n", pdf.Error())
}
We make use of this error mechanism in main(), after all PDF processing is done.
Loading the CSV data
loadCSV() function unchanged.func loadCSV(path string) [][]string {
f, err := os.Open(path)
if err != nil {
log.Fatalf("Cannot open '%s': %s\n", path, err.Error())
}
defer f.Close()
r := csv.NewReader(f)
rows, err := r.ReadAll()
if err != nil {
log.Fatalln("Cannot read CSV data:", err.Error())
}
return rows
}
path() to fetch the path from os.Args.If no path is passed via the command line, the slice os.Args contains only one entry – the name of the executable. In this case, path() shall return a suitable default value.
func path() string {
	if len(os.Args) < 2 {
		return "ordersReport.csv"
	}
	return os.Args[1]
}
The Initial PDF document
func newReport() *gofpdf.Fpdf {
New() to create a PDF document with- landscape (“L”) or portrait (“P”) orientation,
- the unit used for expressing lengths and sizes (“mm”),
- the paper format (“Letter”), and
- the path to a font directory.
All of these can remain empty, in which case New() provides suitable defaults.
Function New() returns an object of type *gofpdf.Fpdf that
provides a number of methods for filling the document.
pdf := gofpdf.New("L", "mm", "Letter", "")
pdf.AddPage()
pdf.SetFont("Times", "B", 28)
Cell() method moves
the current position to the end of the cell so that the next call
to Cell() continues after the previous cell. pdf.Cell(40, 10, "Daily Report")
Ln() function moves the current position to a new line, with
an optional line height parameter. pdf.Ln(12)
pdf.SetFont("Times", "", 20)
pdf.Cell(40, 10, time.Now().Format("Mon Jan 2, 2006"))
pdf.Ln(20)
return pdf
}
How Cell() and Ln() advance the output position
As mentioned in the comments, the Cell() method takes no coordinates. Instead, the PDF document maintains the current output position internally, and advances it to the right by the length of the cell being written.
Method Ln() moves the output position back to the left border and down by the provided value. (Passing -1 uses the height of the recently written cell.)
The Table Header: Formatted Cells
func header(pdf *gofpdf.Fpdf, hdr []string) *gofpdf.Fpdf {
	pdf.SetFont("Times", "B", 16)
	pdf.SetFillColor(240, 240, 240)
	for _, str := range hdr {
CellFormat() method takes a couple of parameters to format
the cell. We make use of this to create a visible border around
the cell, and to enable the background fill. pdf.CellFormat(40, 7, str, "1", 0, "", true, 0, "")
}
-1 to Ln() uses the height of the last printed cell as
the line height. pdf.Ln(-1)
return pdf
}
The Table Body
func table(pdf *gofpdf.Fpdf, tbl [][]string) *gofpdf.Fpdf {
	pdf.SetFont("Times", "", 16)
	pdf.SetFillColor(255, 255, 255)
	align := []string{"L", "C", "L", "R", "R", "R"}
	for _, line := range tbl {
		for i, str := range line {
CellFormat() method to create a visible
border around the cell. We also use the alignStr parameter
here to print the cell content either left-aligned or
right-aligned. pdf.CellFormat(40, 7, str, "1", 0, align[i], false, 0, "")
}
pdf.Ln(-1)
}
return pdf
}
The Image
func image(pdf *gofpdf.Fpdf) *gofpdf.Fpdf {
ImageOptions method takes a file path, x, y, width, and height
parameters, and an ImageOptions struct to specify a couple of options. pdf.ImageOptions("stats.png", 225, 10, 25, 25, false, gofpdf.ImageOptions{ImageType: "PNG", ReadDpi: true}, 0, "")
return pdf
}
Saving The Document
Finally, the convenience method OutputFileAndClose() lets us save the
finished document.
func savePDF(pdf *gofpdf.Fpdf) error {
	return pdf.OutputFileAndClose("report.pdf")
}
How to get and run the code
Step 1: go get the code. Note the -d flag that prevents auto-installing
the binary into $GOPATH/bin.
go get -d github.com/appliedgo/pdf
Step 2: cd to the source code directory.
cd $GOPATH/src/github.com/appliedgo/pdf
Step 3. Run the binary.
go run pdf.go
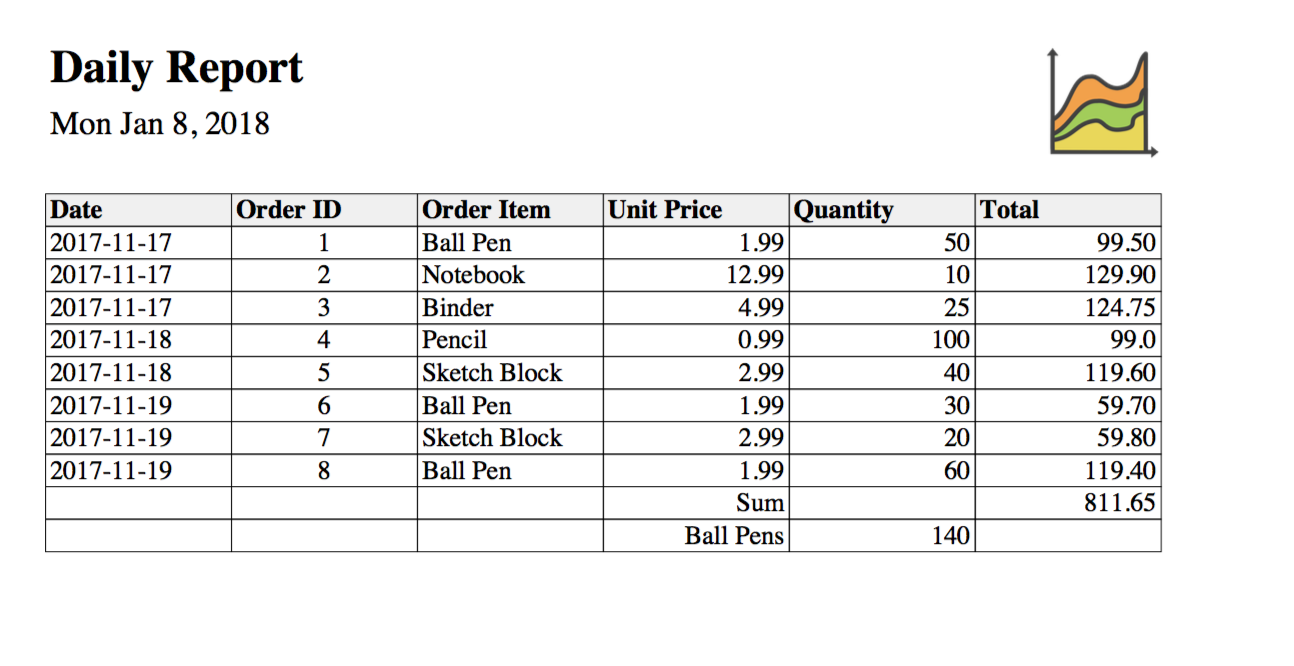
Then you should find a file named “report.pdf” in the same directory. The document should look like this:
Try pimping up the report a bit! How about:
- adjusting the column widths
- ensuring the table always spans the printable width (and then change the orientation to portrait)
- aligning the decimal points (hint: cheat a bit by using a fixed-width font)
Links
If you want to look into a real-world scenario, read [this blog post] (https://blog.gopheracademy.com/advent-2017/building-medical-reports-in-go/) from the Gopher Academy Advent series 2017.
And don't go overboard with the formatting. Less is more.
Happy coding!
Imports and globals