
Message Queues, or how you can make processes talk to each other
Consider two processes that need to exchange commands and data. You want to connect them in a way that is straightforward, efficient, and reliable. How would you do that?
Enter Message Queues.
Table of contents
When Processes need to talk
Applications and services often need to be scalable. The user base might grow from 10 to 10,000, or the incoming number of requests might increase by some orders of magnitude. One approach to scaling is to use faster computers. The other one is to use more computers and distribute workload among them.
Another scenario: Sometimes you need to keep separate concerns completely separated. In other words, every distinct functionality shall run as a separate OS process: A database, a Web server, a process that implements your business logic, and so forth.
Message Queues help connecting these processes.
Message Queues in a nutshell
Message Queue systems (or short, MQ systems) provide a means to pass arbitrary messages between processes. Usually they provide some sorts of topologies, or communication patterns, each of which fits a particular communication purpose.
Some MQ systems also provide a brokerage service, which acts as a well-known contact point for finding a particular service, as well as for routing messages from sender to receiver. This can be convenient especially for large distributed systems. Small systems may do well without a broker and thus benefit from higher throughput, as brokerless MQ systems can be much faster.
nanomsg - the minimalist MQ framework
In order to look into some examples of inter-process communications, we will use [nanomsg][NMG], a lightweight messaging system that has a couple of benefits:
- nanomsg does not need a broker, nor a server infrastructure. Lightweight as can be.
- nanomsg is dead-easy to understand and to use. No bloated concepts and over-complicated implementations.
- nanomsg provides a reasonable set of common communication topologies (also called “scalability protocols” in nanomsg terminology) out of the box. No need to reinvent the wheel over and over again.
- A pure Go client is available (see below).
- There is a ton of nanomsg implementations for other languages available, too. Want to connect your Go process with some other process written in C++, Java, Python, Rust, Ocaml, Erlang,…? Here you go!
Mangos: nanomsg in pure Go
Mangos is a Go implementation of nanomsg. It features an easy and intuitive API, as we will discover later when going through a first example.
How does nanomsg define communication patterns?
It does so by providing so-called “Scalability Protocols”. Each Scalability Protocol defines a particular communication pattern.
These protocols are currently defined:
Pair

Motto: Scale your application by breaking it in two pieces.
Request-Reply
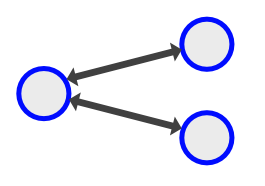
Motto: Distribute workload among multiple stateless workers.
Publisher-Subscriber
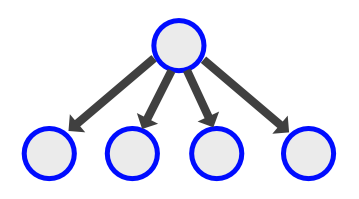
Motto: Broadcast messages to multiple destinations. Receivers can subscribe to specific topics.
Pipeline

Motto: Collect output from multiple nodes of one processing step and distribute it among the nodes of the next processing step.
Survey
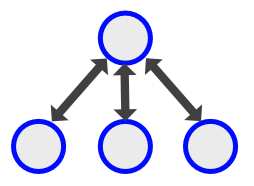
Motto: Broadcast a survey and gather the responses. Wait for the replies for a certain time only.
Bus
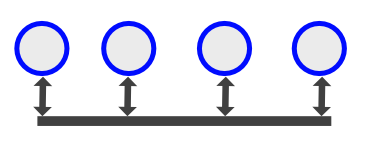
Motto: Broadcast messages from any node to all other nodes.
The basic building block of a Scalability Protocol is a nanomsg Socket.
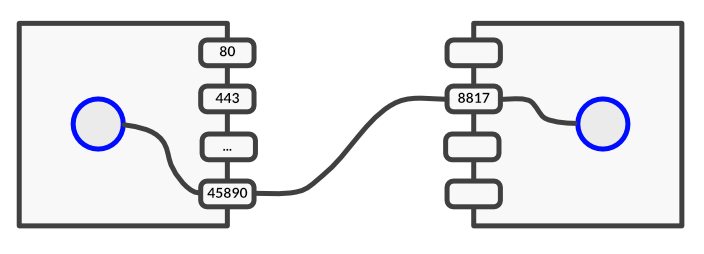
What is a socket?
Sockets in general are messaging endpoints, usually defined by
- a transport mechanism,
- an IP address, and
- a port number.
Example:
tcp://192.168.0.42:45890
nanomsg provides a couple of transport mechanisms:
- In-process
- Inter-process (but still on the same machine)
- TCP
- WebSockets
A process can provide a socket to other processes, as well as connect to a remote socket of another process.
When a process provides a socket to others, it “listens” on the socket (in Mangos lingo). When it connects to a remote socket, it “dials” this socket. (You can see this distinction later in our expample.)
Sockets in nanomsg have another interesting feature: They impelement a particular Scalability Protocol. That means, a nanomsg socket takes care of managing all internals of the protocol so that your code can more or less focus on sending and receiving messages.
A first example: PAIR
Let's dive straight into our first example: A simple PAIR communication.
The PAIR protocol lets two processes send messages to each other. None of the two nodes has a particular role. Each one can send and receive messages to and from the other one.
Typical use case: To split up a large application into two smaller parts.
Outline
So what are we going to implement? In short, we want to have two processes running. One of them listens on a socket, the other one dials that socket. Once they are connected, they exchange a couple of messages.
You can get the full source code at github.
Use go get -d to ensure that the binary does not get installed into your $GOPATH/bin directory. Rather, use go build to generate a local binary that you then can run as ./messaging.
Installing Mangos
(Note: If you go get the messaging code, Mangos is already included via the vendor directory. In this case you do not need to install Mangos separately.)
Installing Mangos is as easy as entering
go get -u github.com/go-mangos/mangos
on the command line. To ensure everything has been installed correctly, you might want to run the tests. For this, enter:
go test $GOPATH/src/github.com/go-mangos/mangos/test
If everything is ok, we can move forward to creating a sample PAIR implementation.
Implementing a PAIR example
package main

import (
	"fmt"
	"log"
	"os"
	"time"

	"github.com/go-mangos/mangos"
	"github.com/go-mangos/mangos/protocol/pair"
	"github.com/go-mangos/mangos/transport/ipc"
	"github.com/go-mangos/mangos/transport/tcp"
)
var (
	node string
)
pair package. Our new socket will therefore automatically support the PAIR protocol.func newSocket() mangos.Socket {
socket, err := pair.NewSocket()
if err != nil {
log.Fatalf("Node %s: Cannot create socket: %s\n", node, err.Error())
}
	socket.AddTransport(ipc.NewTransport())
	socket.AddTransport(tcp.NewTransport())
	socket.SetOption(mangos.OptionRecvDeadline, 10*time.Second)
	return socket
}
send() function that sends a simple string as the message.Looks quite easy, doesn't it? We just do a socket.Send(...) here, with some additional logging and error handling. The Socket's Send() method expects a []byte parameter, but converting from string to []byte is straightforward.
For sending more complex messages, the sending process needs to serialize your message into a []byte slice, and the receiving process needs to de-serialize the slice again. While serializing and de-serializing is not terribly complex, we do not look into this right now as we want to keep this example as simple as possible.
func send(socket mangos.Socket, message string) {
	log.Printf("Node %s sends %s\n", node, message)
	err := socket.Send([]byte(message))
	if err != nil {
		log.Fatalf("Node %s failed to send '%s': %s\n", node, message, err.Error())
	}
}
func receive(socket mangos.Socket) string {
socket.Recv() does not receive anything for 10 seconds, it returns an error that the receive() function turns into a log.Fatalf() message. Keep in mind that the Fatal...() methods of Go's standard log package exit the process immediately after writing the log message. Real-life code would do some more sophisticated error handling here of course. bytes, err := socket.Recv()
if err != nil {
log.Fatalf("Node %s failed receiving a message: %s\n", node, err.Error())
}
message := string(bytes)
log.Printf("Node %s received %s\n", node, message)
return message
}
func runNode(url string) {
newSocket function that we defined earlier. socket := newSocket()
err := socket.Listen(url)
	if err != nil {
		log.Printf("Node %s cannot listen on socket '%s': %s\nTrying to dial instead\n", node, url, err.Error())
		err = socket.Dial(url)
		if err != nil {
			log.Fatalf("Node %s can neither listen nor dial on socket '%s': %s\n", node, url, err.Error())
		}
	}
defer socket.Close()
	for i := 0; i < 3; i++ {
		send(socket, fmt.Sprintf("message %d from node %s.", i, node))
		_ = receive(socket)
		time.Sleep(1 * time.Second)
	}
	log.Printf("Node %s: Done.\n", node)
}
func main() {
	if len(os.Args) <= 2 {
		log.Printf("Usage: %s 0|1 <url>\n", os.Args[0])
	} else {
		node = os.Args[1]
		runNode(os.Args[2])
	}
}
To run this example, get the code from github:
go get -d github.com/appliedgo/messaging
(The -d flag prevents Go from installing the binary in your $GOPATH/bin directory.)
Then cd to the pair directory and run:
go build
Then open a second terminal and cd to the same directory. In the first terminal, enter
$ ./messaging 0 "tcp://localhost:54545"
and in the other one, type
$ ./messaging 1 "tcp://localhost:54545"
(Note that you can pick an arbitrary port number from the “Dynamic” range between 49,151 and 65,535 - they only need to be the same for both processes.)
If you started node 0 first, your output should look like this:
$ ./messaging 0 "tcp://localhost:45454"
2016/02/04 11:44:55 Node 0 sends message 0 from node 0.
2016/02/04 11:44:58 Node 0 received message 0 from node 1.
2016/02/04 11:44:58 Node 0 sends message 1 from node 0.
2016/02/04 11:44:58 Node 0 received message 1 from node 1.
2016/02/04 11:44:58 Node 0 sends message 2 from node 0.
2016/02/04 11:44:58 Node 0 received message 2 from node 1.
2016/02/04 11:44:58 Node 0: Done.
And node 1 should have procuded something like this:
$ ./messaging 1 "tcp://localhost:45454"
2016/02/04 11:44:58 Node 1 cannot listen on socket 'tcp://localhost:45454': listen tcp 127.0.0.1:45454: bind: address already in use
Trying to dial instead
2016/02/04 11:44:58 Node 1 sends message 0 from node 1.
2016/02/04 11:44:58 Node 1 received message 0 from node 0.
2016/02/04 11:44:58 Node 1 sends message 1 from node 1.
2016/02/04 11:44:58 Node 1 received message 1 from node 0.
2016/02/04 11:44:58 Node 1 sends message 2 from node 1.
2016/02/04 11:44:58 Node 1 received message 2 from node 0.
2016/02/04 11:44:58 Node 1: Done.
Exercise 1
Try ipc: instead of tcp:
Exercise 2
The loop in runNode may seem silly as it serializes sending and receiving for no good reason (other than trying to remain simple).
Turn the loop into two goroutines that send and receive independently.
What's next?
The PAIR protocol is the simplest one of the Scalability Protocols. The more complex ones are, not surprisingly, also the more interesting ones. In the next article we'll explore the PubSub protocol, a common pattern for distributing information from one sender to multiple receivers.
Updates and errata
- 2016-05-29 Fixed: Small glitch in the path of
go test. - 2016-05-29 Updated: Mangos is now in the vendor dir. You can use
go get github.com/appliedgo/messagingwithout go-getting Mangos first. - 2016-05-30 Fixed: Broken links and a small typo.
- 2016-06-13 Fixed: go get was missing the -d flag.
For this example, we import the PAIR protocol and the ipc and tcp transports.